Add the Address Field
To add an address, use the text object. Text objects let you place text or the contents of fields in the workspace.

Figure 4.4: Address field: it should look like this.
1. Choose Insert > Text (Objects > Insert > Text).

Figure 4.5: Tab "Insert"
2. Pull the object to the required size.
3. The formula wizard will now appear, which you can use to define the contents of the text object.

Figure 4.6: Formula wizard with variable
This dialog consists of a series of tabs. On the "Data and Functions" tab, select the variable for the company address (company) from the list of available variables and fields.
You will see an auto filter field above the list of data. This means that you can enter "Company" to display all fields and variables containing this expression.
Select the variable that you want by double-clicking and confirm your selection with OK. You have now defined the first line of the address field.
4. A text object can hold as many paragraphs as you want and they can all have completely different display properties. You can add more paragraphs by means of the Text Tools (mini-toolbar). Choose "Append" to define an additional line.

Figure 4.7: Adding another paragraph via the Text Tools
5. The formula wizard will now appear, which you can use to define the contents of the paragraph. Now enter the first name and the last name of the recipient. First choose the "Firstname" variable.

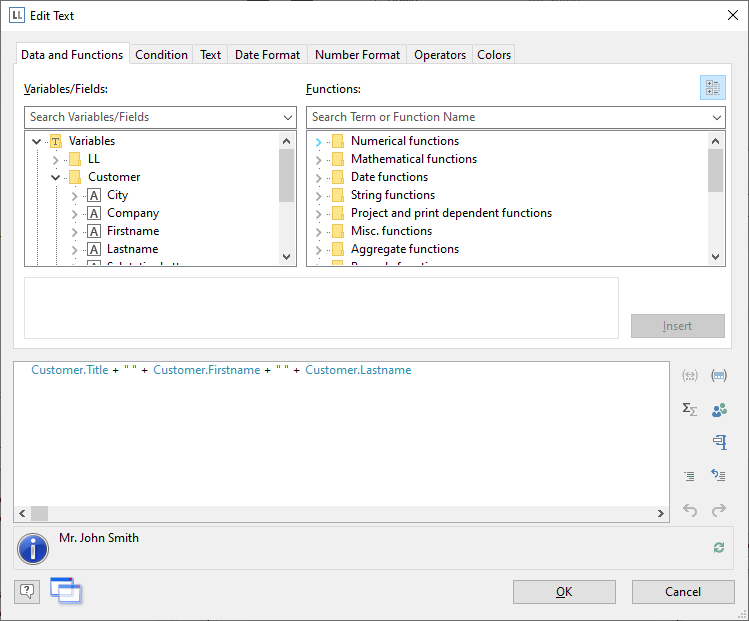
Figure 4.8: Linking variables and text
6. You should insert a space before choosing the "Lastname" variable to prevent the contents of the two variables from being placed directly end to end. A space is simply "Text". Fixed text must be enclosed in quotation marks. So now enter "+" as a joining operator followed by " " for the space.
7. Now select the "Lastname" variable. You must of course also join this with "+".
8. Now continue with the other variables: street and city. You have now completed the address field.

Figure 4.9: Text field with 4 paragraphs